SSD1306 OLED Display with Arduino
Published
Displaying graphics and text on the SSD1306 display with Arduino
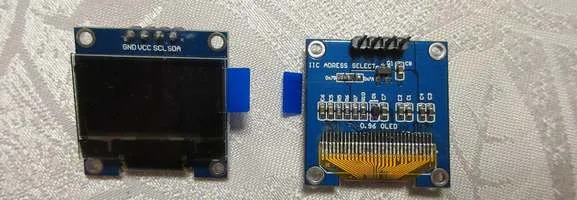
What is the SSD1306?
The SSD1306 is a driver chip for 128⨯64 OLED (Organic Light Emitting Diode) displays. It can support many communication interfaces, but we will be using I2C.
Note | Even though the chip is rated at 3.3V communication, many display modules have on-board circuitry that can help it tolerate 5V. This means it can be used with both 5V and 3.3V logic. |
SSD1306 Pixel Numbering
The pixels on the SSD1306 are numbered starting from the top-left corner at (0, 0), then increasing until (127, 63) in the bottom-right corner.

SSD1306 Column Numbering
Each column is one pixel wide.

SSD1306 Page Numbering
The SSD1306 has eight pages, each one being a group of pixels 8 tall and 128 wide:

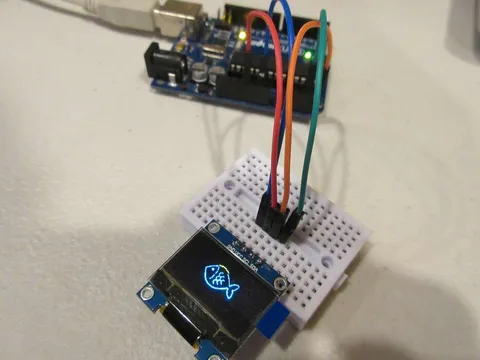
I2C Connections to Arduino
The SSD1306 display module connects to the Arduino’s 5V, GND, SDA, and SCL pins.
You will need to know your display’s I2C address before running any code. You can run an I2C scanner program on your Arduino.
In the example code, the address is set to 0x3C. If your address is different, substitute it in for each instance of display.begin(0x3C); across the examples.
Library
This project uses my SSD1306_I2C library. Download the library in Zip format
Drawing Graphics
Example code for drawing graphics is located at , also available below.
/*
   DrawGraphics.ino
   Sketch to demonstrate drawing basic graphics on the OLED.
   Created July 2, 2020
*/

#include <SSD1306_I2C.h>
#include <Wire.h>

SSD1306 display;

void setup() {
  Wire.begin();
  display.begin(0x3C);

  // Draw 100 pixels in random locations
  for (int i = 0; i < 100; i++) {
    // Coordinates are created with random()
    int x = random(0, 128);
    int y = random(0, 64);

    // Draw the pixel
    display.drawPixel(x, y, HIGH); // Draw pixel at (x, y)
  }

  display.updateDisplay(); // Must be called after graphics methods
  delay(1500); // Delay to let the user see the graphics
  display.clear(); // Clear the display

  // Draw lines
  display.drawLine(0, 0, 70, 50, HIGH);          // With coordinates
  display.drawAngledLine(70, 50, 30, 285, HIGH); // With a coordinate, length, and angle

  display.updateDisplay();
  delay(1500);
  display.clear();

  // Draw rectangles
  display.drawRect(10, 15, 30, 40, HIGH, OUTLINE);          // With top-left coordinates, width, and height
  display.drawRectByCoords(20, 20, 100, 50, HIGH, OUTLINE); // With top-left and bottom-right coordinates
  display.drawRect(30, 30, 10, 15, HIGH, FILL);
  display.drawRectByCoords(60, 30, 80, 50, HIGH, FILL);

  display.updateDisplay();
  delay(1500);
  display.clear();

  // Draw circles with center coordinates and radius
  display.drawCircle(64, 32, 30, HIGH, OUTLINE);
  display.drawCircle(20, 20, 20, HIGH, FILL);

  display.updateDisplay();
  delay(1500);
  display.clear();
  display.updateDisplay();
}

void loop() {}Initialization
The SSD1306 constructor takes no parameters.
Before using the SSD1306, Wire.begin must be called to initialize the I2C bus.
Initialization of the SSD1306 is done with:
begin: Starts I2C communication and sends initialization commands to the SSD1306. Takes a single parameter: the I2C address of the display.
Graphics Methods
updateDisplay sends what is in the display buffer to the SSD1306 over I2C.
Important | This should be called after using the below graphics methods to display the results on screen. Graphics methods do not change the screen by themselves. |
clear: Sets the contents of the display buffer to 0. Takes no parameters.
The methods below draw various graphics; parameters are listed under each. The following parameters are shared by multiple functions:
color: How the drawn pixels appear. UseHIGHto turn them on, orLOWto turn them off.fill: If the drawn shape is filled. UseOUTLINEto draw an outline only, orFILLto fill in the shape.
drawPixel: Draws a single pixel.
x: X-coordinate of the pixely: Y-coordinate of the pixelcolor
drawLine: Draws a line.
x0: X-coordinate of the first endpointy0: Y-coordinate of the first endpointx1: X-coordinate of the second endpointy1: Y-coordinate of the second endpointcolor
drawAngledLine: Draws a line given an angle and length.
x: X-coordinate of the first endpointy: Y-coordinate of the first endpointlength: Length of the line in pixelsangle: Angle of the line in degrees (0: to the right, increasing values rotate clockwise)color
drawRect: Draws a rectangle.
x0: X-coordinate of the top-left cornery0: Y-coordinate of the top-left cornerw: Width of the rectangle in pixelsh: Height of the rectangle in pixelscolorfill
drawRectByCoords: Draws a rectangle given the coordinates of the top-left and bottom-right corners.
x0: X-coordinate of the top-left cornery0: Y-coordinate of the top-left cornerx1: X-coordinate of the bottom-right cornery1: Y-coordinate of the bottom-right cornercolorfill
drawCircle: Draws a circle.
x: X-coordinate of the centery: Y-coordinate of the centerr: Radius of the circle in pixelscolorfill
print, println: Prints text; the latter moves the cursor to the next line.
s: Data to print (can be string, char, float/double, or number in the range ±2,147,483,647)colornplaces: Number of decimal places to print (optional, only withsas float or double)
These methods accept printable characters, i.e., ASCII codes 32-126 (plus the newline and tab). Tabs are printed as 4 spaces.
Tip | println can also be called with no parameters to move the cursor only. |
Drawing Text
Example code:
This code demonstrates how data and text can be printed to the screen.
/*
   DrawText.ino
   Sketch to demonstrate drawing text on the OLED.
   Created July 2, 2020
*/

#include <SSD1306_I2C.h>
#include <Wire.h>

SSD1306 display;

void setup() {
  Wire.begin();
  display.begin(0x3C);

  // Print strings
  display.println("Hello World!", HIGH);
  display.print("abcdefg", HIGH);

  display.updateDisplay();
  delay(2000);
  display.clear();

  // Print inverted text
  display.drawRect(10, 10, 80, 30, HIGH, FILL);
  display.setTextSize(2);
  display.setCursor(15, 20);
  display.print("Invert", LOW);

  display.updateDisplay();
  delay(2000);
  display.clear();

  // Print with various text sizes and cursor locations
  display.setTextSize(2);  // Characters are now twice as big
  display.setCursor(0, 0); // Top-left corner of screen
  display.print("abcd\tef", HIGH);
  display.setCursor(20, 30);
  display.print("1234", HIGH);

  display.updateDisplay();
  delay(2000);
  display.clear();

  // Chars and numbers can also be printed:
  display.setCursor(0, 0); // Cursor to top-left corner
  display.setTextSize(1);  // Small chars (5px by 7px)

  // Print a char
  display.print("Char: ", HIGH);
  display.println('a', HIGH); // println() moves cursor to next line

  // Print an integer
  display.print("Int: ", HIGH);
  display.println(32767, HIGH);

  // Print a long
  display.print("Long: ", HIGH);
  display.println(2147483647, HIGH);

  // Print a float
  display.print("Float: ", HIGH);
  display.println(123.45, HIGH);

  // Print a float, displayed to # of decimals
  display.println("Float to 3 decimals:", HIGH);
  display.println(123.4567, HIGH, 3);

  display.updateDisplay();
  delay(2000);
  display.clear();

  // Print all standard ASCII chars
  display.setCursor(0, 0); // Reset cursor

  for (int i = 0; i < 94; i++) {
    display.print((char)(i + 33), HIGH);

    // 20 chars (with text size 1) fit on one line, so make a new line if needed
    if (((i % 20) == 0) && (i != 0)) display.println();
  }

  display.updateDisplay();
}

void loop() {}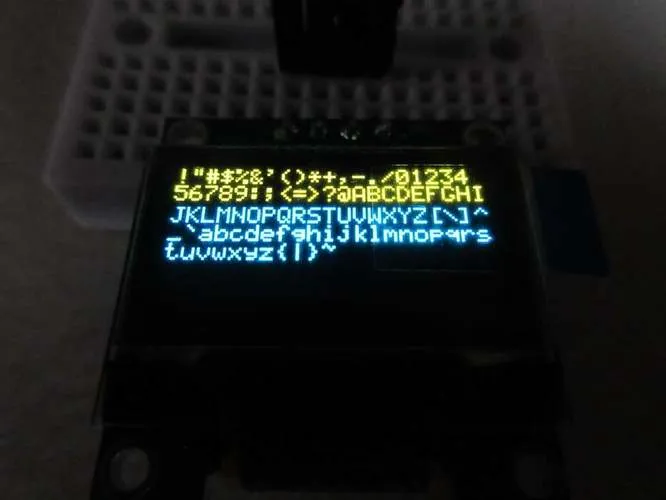
Size and Positioning
setTextSize: Determines the size of the text to be printed. The height of a character will be 7 times the text size, and the width will be 5 times the text size (both in pixels). The default text size is 1.
size: The size of the characters to print
setCursor: Determines the location of an invisible cursor. Any text created with print or println will start at the location provided. The default cursor position is (0, 0).
x: X-coordinate of the cursor’s top-left cornery: Y-coordinate of the cursor’s top-left corner
Other Control Commands
Example code:
This code shows various controls supported by the library, such as inverting the display and turning it on/off.
/*
   ControlCommands.ino
   Sketch to demonstrate various commands to send to the OLED.
   Note: None of these commands affect the display's RAM, so
   updateDisplay() isn't needed.
   Created July 2, 2020
*/

#include <SSD1306_I2C.h>
#include <Wire.h>

SSD1306 display;

void setup() {
  Wire.begin();
  display.begin(0x3C);

  // Display a filled rectangle
  display.drawRect(20, 10, 100, 40, HIGH, FILL);
  display.updateDisplay(); // Show the rectangle

  // Invert the display
  delay(2000);
  display.setInvert(true);  // Inverted display
  delay(2000);
  display.setInvert(false); // Normal display

  // Turn display off/on
  delay(2000);
  display.setState(false);  // Display off (sleep mode)
  delay(2000);
  display.setState(true); // Display on (RAM contents are displayed)

  // Turn all pixels on, then resume display
  delay(2000);
  display.displayAllOn();  // All pixels on, regardless of RAM contents
  delay(2000);
  display.resumeDisplay(); // Display what is in RAM
}

void loop() {}Control Methods
The control methods below do not affect the display’s RAM or the display buffer stored in the Arduino. This means updateDisplay is not needed for these to take effect.
setInvert: Sets the inverted state of the display. When the display is not inverted, the RAM contents are displayed normally. When it is inverted, pixels that are supposed to be on turn off (and the other way around).
invert: If the display is inverted: inverted if true, normal if false
setState: Turns the display on/off. When the display is on, the RAM contents are displayed. If the display is off, all pixels are turned off.
on: If the display is on (display on if true, off if false)
displayAllOn: Turns all pixels of the display on, regardless of the RAM contents. Takes no parameters.
resumeDisplay: Displays what is in the RAM; normally used after the above methods. Takes no parameters.
Scrolling
The SSD1306 has the built-in ability to scroll. It can either scroll horizontally or horizontally and vertically (there is no vertical-only scrolling).
Example code:
/*
   ScrollDisplay.ino
   Sketch to demonstrate scrolling on the OLED.
   Created July 2, 2020
*/

#include <SSD1306_I2C.h>
#include <Wire.h>

SSD1306 display;

void setup() {
  Wire.begin();
  display.begin(0x3C);

  // Print the word "scroll" three times
  display.setTextSize(2);
  display.setCursor(0, 0);
  display.println("scroll", HIGH);
  display.println("scroll", HIGH);
  display.println("scroll", HIGH);
  display.updateDisplay();

  // Horizontal scroll left, scroll pages 0-7, 2 frames interval
  display.setupScrollH(LEFT, 0, 7, FRAMES_2);
  display.startScroll(); // Begin scroll
  delay(2000);           // Scroll for 2 seconds
  display.stopScroll();  // Stop scrolling
  delay(500);            // Wait half a second between scrolling

  // Horizontal scroll right, scroll pages 0-7, 2 frames interval
  display.setupScrollH(RIGHT, 0, 7, FRAMES_2);
  display.startScroll();
  delay(2000);
  display.stopScroll();
  delay(500);

  // Vertical+horizontal scroll left and up, scroll pages 0-7, 2 frames interval
  display.setupScrollHV(LEFT, UP, 0, 7, FRAMES_2);
  display.startScroll();
  delay(2000);
  display.stopScroll();
  delay(500);

  // Vertical+horizontal scroll right and down, scroll pages 0-7, 2 frames interval
  display.setupScrollHV(RIGHT, DOWN, 0, 7, FRAMES_2);
  display.startScroll();
  delay(2000);
  display.stopScroll();
  delay(500);

  // Only scroll first page
  display.clear();
  display.setCursor(0, 0);
  display.println("scroll", HIGH);
  display.print("no scroll", HIGH);
  display.updateDisplay();
  delay(500);

  // Horizontal scroll left, scroll pages 0-1, 2 frames interval
  display.setupScrollH(LEFT, 0, 1, FRAMES_2);
  display.startScroll();
  delay(2000);
  display.stopScroll();
}

void loop() {}Scrolling Setup
setupScrollH, setupScrollHV: Configures scrolling in the horizontal and 45-degree directions, respectively.
dirX: Horizontal scrolling direction (use the constantsLEFTorRIGHT)dirY: Vertical scrolling direction (use the constantsUPorDOWN) (setupScrollHV only)start: Which page to start scrolling (0-7, inclusive)end: Which page to stop scrolling (0-7, inclusive) (must be greater than or equal to start)interval: The time interval between each scroll step, in terms of frame frequency
You may use any of the following constants for the last parameter:
FRAMES_2FRAMES_3FRAMES_4FRAMES_5FRAMES_25FRAMES_64FRAMES_128FRAMES_256
Note | The smaller the interval, the smoother the scrolling. For example, FRAMES_2 is smoother than FRAMES_25. |
startScroll: Tells the display to start scrolling. Takes no parameters.
stopScroll: Tells the display to stop scrolling. Takes no parameters.
Note | Scrolling affects the data in the display’s RAM, so to revert it to its pre-scroll state, you will have to also use this with updateDisplay. |
Displaying Bitmaps
The SSD1306 can display bitmap images with a size up to 128⨯64. Bitmaps are read from arrays of unsigned char stored in PROGMEM.
Example code:
/*
   DisplayBitmap.ino
   Sketch to demonstrate displaying bitmaps on the OLED.
   Created July 2, 2020
   Modified September 28, 2020
*/

#include <SSD1306_I2C.h>
#include <Wire.h>

SSD1306 display;

// Define bitmap of a fish (must be placed in PROGMEM)
const PROGMEM unsigned char image[] = {
  0x00, 0x00, 0x00, 0x00, 0x00, 0x00, 0x00, 0x00, 0x00, 0x00, 0x00, 0x00, 0x00, 0x00, 0x00, 0x00,
  0x00, 0x00, 0x00, 0x00, 0x00, 0x00, 0x00, 0x00, 0x00, 0x00, 0x00, 0x00, 0x00, 0x00, 0x00, 0x00,
  0x00, 0x00, 0x00, 0x00, 0x00, 0x00, 0x00, 0x00, 0x00, 0x00, 0x00, 0x00, 0x00, 0x00, 0x00, 0x00,
  0x00, 0x00, 0x00, 0x00, 0x00, 0x00, 0x00, 0x00, 0x00, 0x00, 0x00, 0x00, 0x00, 0x00, 0x00, 0x00,
  0x00, 0x00, 0x00, 0x00, 0x00, 0x00, 0x00, 0x00, 0x00, 0x00, 0x00, 0x00, 0x00, 0x00, 0x00, 0x00,
  0x00, 0x00, 0x00, 0x00, 0x00, 0x00, 0x00, 0x00, 0x00, 0x00, 0x00, 0x00, 0x00, 0x00, 0x00, 0x00,
  0x00, 0x00, 0x00, 0x00, 0x00, 0x00, 0x00, 0x00, 0x00, 0x00, 0x00, 0x00, 0x00, 0x00, 0x00, 0x00,
  0x00, 0x00, 0x00, 0x00, 0x00, 0x00, 0x00, 0x00, 0x00, 0x00, 0x00, 0x00, 0x00, 0x00, 0x00, 0x00,
  0x00, 0x00, 0x00, 0x00, 0x00, 0x00, 0x00, 0x00, 0x00, 0x00, 0x00, 0x00, 0x00, 0x00, 0x00, 0x00,
  0x00, 0x00, 0x00, 0x00, 0x00, 0x00, 0x00, 0x00, 0x00, 0x00, 0x00, 0x00, 0x00, 0x00, 0x00, 0x00,
  0x00, 0x00, 0x00, 0x00, 0x00, 0x00, 0x00, 0x00, 0x00, 0x00, 0x00, 0x00, 0x00, 0x00, 0x00, 0x00,
  0x00, 0x00, 0x00, 0x00, 0x00, 0x00, 0x00, 0x00, 0x00, 0x00, 0x00, 0x00, 0x00, 0x00, 0x00, 0x00,
  0x00, 0x00, 0x00, 0x00, 0x00, 0x00, 0x00, 0x00, 0x00, 0x00, 0x00, 0x00, 0x00, 0x00, 0x00, 0x00,
  0x00, 0x00, 0x00, 0x00, 0x00, 0x00, 0x03, 0xfc, 0x00, 0x00, 0x00, 0x00, 0x00, 0x00, 0x00, 0x00,
  0x00, 0x00, 0x00, 0x00, 0x00, 0x00, 0x0e, 0x03, 0xc0, 0x00, 0x00, 0x00, 0x00, 0x00, 0x00, 0x00,
  0x00, 0x00, 0x00, 0x00, 0x00, 0x00, 0x70, 0x00, 0x30, 0x00, 0x00, 0x00, 0x00, 0x00, 0x00, 0x00,
  0x00, 0x00, 0x00, 0x00, 0x00, 0x01, 0xa0, 0x00, 0x0c, 0x00, 0x00, 0x00, 0x00, 0x00, 0x00, 0x00,
  0x00, 0x00, 0x00, 0x00, 0x00, 0x03, 0x10, 0x00, 0x02, 0x00, 0x00, 0x00, 0x00, 0x00, 0x00, 0x00,
  0x00, 0x00, 0x00, 0x00, 0x00, 0x04, 0x10, 0x00, 0x01, 0x80, 0x00, 0x70, 0x00, 0x00, 0x00, 0x00,
  0x00, 0x00, 0x00, 0x00, 0x00, 0x08, 0x08, 0x0c, 0x00, 0xc0, 0x01, 0x88, 0x00, 0x00, 0x00, 0x00,
  0x00, 0x00, 0x00, 0x00, 0x00, 0x10, 0x08, 0x10, 0x00, 0x20, 0x06, 0x08, 0x00, 0x00, 0x00, 0x00,
  0x00, 0x00, 0x00, 0x00, 0x00, 0x20, 0x00, 0x20, 0x00, 0x10, 0x0c, 0x00, 0x00, 0x00, 0x00, 0x00,
  0x00, 0x00, 0x00, 0x00, 0x00, 0x40, 0x04, 0x20, 0x60, 0x08, 0x08, 0x08, 0x00, 0x00, 0x00, 0x00,
  0x00, 0x00, 0x00, 0x00, 0x00, 0x87, 0x04, 0x20, 0x80, 0x04, 0x10, 0x10, 0x00, 0x00, 0x00, 0x00,
  0x00, 0x00, 0x00, 0x00, 0x01, 0x8f, 0x04, 0x11, 0x00, 0x02, 0x30, 0x10, 0x00, 0x00, 0x00, 0x00,
  0x00, 0x00, 0x00, 0x00, 0x01, 0x07, 0x04, 0x0b, 0x00, 0x01, 0x20, 0x10, 0x00, 0x00, 0x00, 0x00,
  0x00, 0x00, 0x00, 0x00, 0x02, 0x00, 0x04, 0x1b, 0x0e, 0x00, 0xe0, 0x20, 0x00, 0x00, 0x00, 0x00,
  0x00, 0x00, 0x00, 0x00, 0x04, 0x00, 0x00, 0x11, 0x08, 0x00, 0x40, 0x20, 0x00, 0x00, 0x00, 0x00,
  0x00, 0x00, 0x00, 0x00, 0x04, 0x00, 0x00, 0x20, 0x90, 0x00, 0x00, 0xc0, 0x00, 0x00, 0x00, 0x00,
  0x00, 0x00, 0x00, 0x00, 0x08, 0x00, 0x04, 0x20, 0xf0, 0x00, 0x00, 0xc0, 0x00, 0x00, 0x00, 0x00,
  0x00, 0x00, 0x00, 0x00, 0x04, 0x00, 0x04, 0x21, 0x98, 0x00, 0x00, 0x60, 0x00, 0x00, 0x00, 0x00,
  0x00, 0x00, 0x00, 0x00, 0x02, 0x00, 0x04, 0x11, 0x08, 0x00, 0xe0, 0x20, 0x00, 0x00, 0x00, 0x00,
  0x00, 0x00, 0x00, 0x00, 0x02, 0x00, 0x04, 0x1f, 0x06, 0x01, 0x20, 0x10, 0x00, 0x00, 0x00, 0x00,
  0x00, 0x00, 0x00, 0x00, 0x01, 0x00, 0x04, 0x1b, 0x00, 0x03, 0x20, 0x10, 0x00, 0x00, 0x00, 0x00,
  0x00, 0x00, 0x00, 0x00, 0x00, 0x80, 0x04, 0x11, 0x00, 0x06, 0x10, 0x10, 0x00, 0x00, 0x00, 0x00,
  0x00, 0x00, 0x00, 0x00, 0x00, 0x40, 0x00, 0x20, 0xc0, 0x0c, 0x18, 0x08, 0x00, 0x00, 0x00, 0x00,
  0x00, 0x00, 0x00, 0x00, 0x00, 0x60, 0x08, 0x20, 0x20, 0x18, 0x0c, 0x08, 0x00, 0x00, 0x00, 0x00,
  0x00, 0x00, 0x00, 0x00, 0x00, 0x30, 0x08, 0x30, 0x00, 0x30, 0x04, 0x08, 0x00, 0x00, 0x00, 0x00,
  0x00, 0x00, 0x00, 0x00, 0x00, 0x18, 0x00, 0x18, 0x00, 0x60, 0x03, 0x08, 0x00, 0x00, 0x00, 0x00,
  0x00, 0x00, 0x00, 0x00, 0x00, 0x0c, 0x00, 0x04, 0x00, 0x80, 0x00, 0xd8, 0x00, 0x00, 0x00, 0x00,
  0x00, 0x00, 0x00, 0x00, 0x00, 0x06, 0x00, 0x00, 0x03, 0x00, 0x00, 0x30, 0x00, 0x00, 0x00, 0x00,
  0x00, 0x00, 0x00, 0x00, 0x00, 0x01, 0x80, 0x00, 0x04, 0x00, 0x00, 0x00, 0x00, 0x00, 0x00, 0x00,
  0x00, 0x00, 0x00, 0x00, 0x00, 0x00, 0xc0, 0x00, 0x18, 0x00, 0x00, 0x00, 0x00, 0x00, 0x00, 0x00,
  0x00, 0x00, 0x00, 0x00, 0x00, 0x00, 0x38, 0x00, 0xe0, 0x00, 0x00, 0x00, 0x00, 0x00, 0x00, 0x00,
  0x00, 0x00, 0x00, 0x00, 0x00, 0x00, 0x07, 0xff, 0x00, 0x00, 0x00, 0x00, 0x00, 0x00, 0x00, 0x00,
  0x00, 0x00, 0x00, 0x00, 0x00, 0x00, 0x00, 0x00, 0x00, 0x00, 0x00, 0x00, 0x00, 0x00, 0x00, 0x00,
  0x00, 0x00, 0x00, 0x00, 0x00, 0x00, 0x00, 0x00, 0x00, 0x00, 0x00, 0x00, 0x00, 0x00, 0x00, 0x00,
  0x00, 0x00, 0x00, 0x00, 0x00, 0x00, 0x00, 0x00, 0x00, 0x00, 0x00, 0x00, 0x00, 0x00, 0x00, 0x00,
  0x00, 0x00, 0x00, 0x00, 0x00, 0x00, 0x00, 0x00, 0x00, 0x00, 0x00, 0x00, 0x00, 0x00, 0x00, 0x00,
  0x00, 0x00, 0x00, 0x00, 0x00, 0x00, 0x00, 0x00, 0x00, 0x00, 0x00, 0x00, 0x00, 0x00, 0x00, 0x00,
  0x00, 0x00, 0x00, 0x00, 0x00, 0x00, 0x00, 0x00, 0x00, 0x00, 0x00, 0x00, 0x00, 0x00, 0x00, 0x00,
  0x00, 0x00, 0x00, 0x00, 0x00, 0x00, 0x00, 0x00, 0x00, 0x00, 0x00, 0x00, 0x00, 0x00, 0x00, 0x00,
  0x00, 0x00, 0x00, 0x00, 0x00, 0x00, 0x00, 0x00, 0x00, 0x00, 0x00, 0x00, 0x00, 0x00, 0x00, 0x00,
  0x00, 0x00, 0x00, 0x00, 0x00, 0x00, 0x00, 0x00, 0x00, 0x00, 0x00, 0x00, 0x00, 0x00, 0x00, 0x00,
  0x00, 0x00, 0x00, 0x00, 0x00, 0x00, 0x00, 0x00, 0x00, 0x00, 0x00, 0x00, 0x00, 0x00, 0x00, 0x00,
  0x00, 0x00, 0x00, 0x00, 0x00, 0x00, 0x00, 0x00, 0x00, 0x00, 0x00, 0x00, 0x00, 0x00, 0x00, 0x00,
  0x00, 0x00, 0x00, 0x00, 0x00, 0x00, 0x00, 0x00, 0x00, 0x00, 0x00, 0x00, 0x00, 0x00, 0x00, 0x00,
  0x00, 0x00, 0x00, 0x00, 0x00, 0x00, 0x00, 0x00, 0x00, 0x00, 0x00, 0x00, 0x00, 0x00, 0x00, 0x00,
  0x00, 0x00, 0x00, 0x00, 0x00, 0x00, 0x00, 0x00, 0x00, 0x00, 0x00, 0x00, 0x00, 0x00, 0x00, 0x00,
  0x00, 0x00, 0x00, 0x00, 0x00, 0x00, 0x00, 0x00, 0x00, 0x00, 0x00, 0x00, 0x00, 0x00, 0x00, 0x00,
  0x00, 0x00, 0x00, 0x00, 0x00, 0x00, 0x00, 0x00, 0x00, 0x00, 0x00, 0x00, 0x00, 0x00, 0x00, 0x00,
  0x00, 0x00, 0x00, 0x00, 0x00, 0x00, 0x00, 0x00, 0x00, 0x00, 0x00, 0x00, 0x00, 0x00, 0x00, 0x00,
  0x00, 0x00, 0x00, 0x00, 0x00, 0x00, 0x00, 0x00, 0x00, 0x00, 0x00, 0x00, 0x00, 0x00, 0x00, 0x00,
  0x00, 0x00, 0x00, 0x00, 0x00, 0x00, 0x00, 0x00, 0x00, 0x00, 0x00, 0x00, 0x00, 0x00, 0x00, 0x00
};

void setup() {
  Wire.begin();
  display.begin(0x3C);

  // Display the bitmap
  // Top-left corner is (0, 0), width is 128, height is 64, source is the 'image' bitmap
  display.displayBitmapImage(image, 0, 0, 128, 64);
  display.updateDisplay();
}

void loop() {}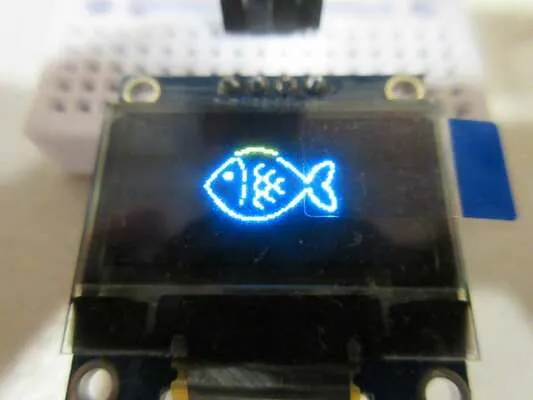
Note | The fish image was taken from Shutterstock. The bitmap array was generated using image2cpp. |
Loading Bitmaps
displayBitmapImage: Draws a bitmap image.
img: Bitmap image to draw (array of unsigned chars in PROGMEM)x: X-coordinate of the top-left cornery: Y-coordinate of the top-left cornerw: Width of the bitmap in pixelsh: Height of the bitmap in pixels
displayBitmap requires your bitmap to be in PROGMEM (program memory). To do this, use the syntax below:
const PROGMEM unsigned char yourImg[] = {
  // Your image data here...
};
In the example, the bitmap is 128 pixels wide and 64 pixels high, and it is displayed at (0, 0).
Other Functions
Raw Commands
sendCommand: Sends a byte to the control register (0x00) of the SSD1306.
x: Byte to send
A list of available commands can be found in the SSD1306 datasheet.