pinMode(4, OUTPUT);
digitalWrite(4, HIGH);Ethernet Shield
Published
Using the Ethernet shield with an Arduino as a web server
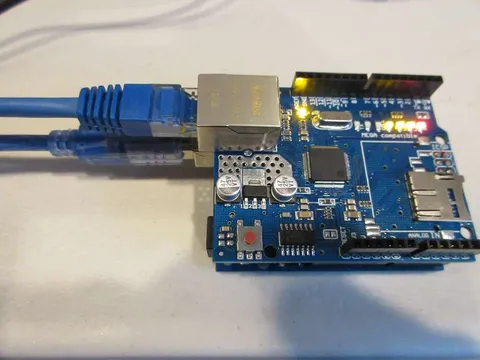
The Ethernet Shield
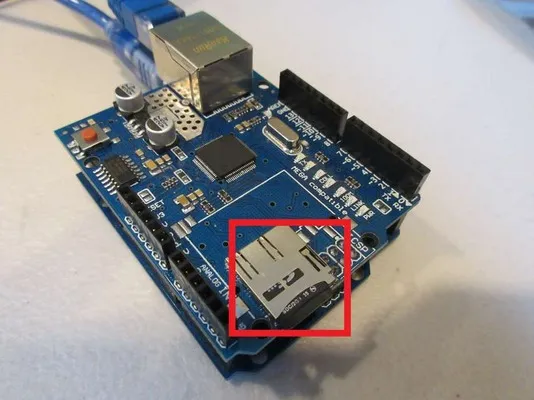
The Ethernet shield provides a standard RJ45 Ethernet jack and micro SD card slot. It has a connection speed of 10/100MB and provides a network stack capable of TCP and UDP.
The shield uses the Ethernet, SPI, and SD libraries, all of which are installed by default in the Arduino IDE. See SD Shield for more details about using the SD library.
Pin Connections
The Ethernet shield uses SPI:
Digital 11-13 for SPI
Digital 10 as the chip select pin for the W5100 Ethernet chip
Digital 4 as the chip select pin for the SD card slot
This shield gets these SPI connections from the ICSP header on the back of the Arduino, so is compatible with boards that have different SPI pins (example: Arduino Mega).
SD Card Note
Leaving in an unused SD card can cause your program to crash or hang. Possible solutions:
Remove the SD card.
Add these lines in
setup:
Setting Up
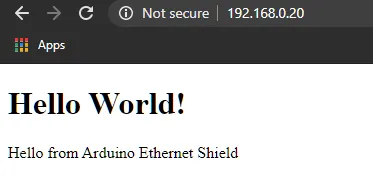
Save this HTML file as index.htm in your SD card:
Important | The Arduino SD library only supports 8.3 file names (maximum file name of 8 characters and maximum file extension of 3 characters). |
<!DOCTYPE html>
<html>

<head>
  <title>Arduino Web Server</title>
</head>

<body>
  <h1>Hello World!</h1>
  <p>Hello from Arduino Ethernet Shield</p>
</body>

</html>
Before powering on your Arduino, insert the SD card into the SD slot.
Code
// Include Ethernet and SPI libraries
#include <SPI.h>
#include <Ethernet.h>
#include <SD.h>

// MAC address (dependent on your network)
byte mac[] = {0xDE, 0xAD, 0xBE, 0xEF, 0xFE, 0xED};
IPAddress ip(192, 168, 0, 20); // IP address is 192.168.0.20

EthernetServer server(80); // Port 80 is default for HTTP

void setup() {
  Serial.begin(9600); // Open a serial port
  Serial.println("Ethernet Web Server");

  // -------------- SD Card init start --------------

  // Disable Ethernet chip while SD card is being initialized
  pinMode(10, OUTPUT);
  digitalWrite(10, HIGH);

  Serial.print("Initializing SD card... ");
  if (!SD.begin(4)) {
    Serial.println("Failed.");
    return;
  }
  Serial.println("Done.");

  // Check if index.htm exists
  Serial.print("Looking for index.htm... ");
  if (!SD.exists("index.htm")) {
    Serial.println("Failed.");
  }
  Serial.println("Done.");

  // -------------- SD Card init end --------------

  // -------------- Ethernet init start --------------

  Ethernet.begin(mac, ip); // Start Ethernet connection with IP and MAC

  if (Ethernet.hardwareStatus() == EthernetNoHardware) {
    // The Ethernet shield is not attached
    Serial.println("Ethernet shield was not found");
    return; // Do nothing
  }
  if (Ethernet.linkStatus() == LinkOFF) {
    // Ethernet cable is not connected
    Serial.println("Ethernet cable is not connected.");
  }

  // Start the server
  server.begin();

  // Print the IP address
  Serial.print("Server is at: ");
  Serial.println(Ethernet.localIP());

  // -------------- Ethernet init end --------------
}

void loop() {
  // Listen for incoming clients
  EthernetClient client = server.available();
  if (client) {
    // New client
    // HTTP requests end with a blank line
    bool currentLineIsBlank = true;
    while (client.connected()) {
      if (client.available()) {
        char c = client.read();
        // if you've gotten to the end of the line (received a newline
        // character) and the line is blank, the http request has ended,
        // so you can send a reply
        if (c == '\n' && currentLineIsBlank) {
          // Send HTTP resonse header
          client.println("HTTP/1.1 200 OK");
          client.println("Content-Type: text/html");
          client.println("Connection: close");  // the connection will be closed after completion of the response
          client.println();

          // Send the page's HTML
          File f = SD.open("index.htm"); // The file to read from

          if (f) {
            while (f.available()) {
              // Send file to client
              client.write(f.read());
            }
            f.close(); // Close file
          } else {
            // Unable to open file
            client.println("Unable to open: index.htm");
          }
          break;
        }
        if (c == '\n') {
          // New line
          currentLineIsBlank = true;
        } else if (c != '\r') {
          // Character on current line
          currentLineIsBlank = false;
        }
      }
    }
    // give the web browser time to receive the data
    delay(1);

    // close the connection:
    client.stop();
  }
}
Explanation
After including the necessary libraries, we declare the MAC and IP addresses (IP for this example is 192.168.0.20).
Next, we initialize the EthernetServer. All communication over HTTP is through port 80.
In the setup function, there is an SD card init section. Note that both the SD card and Ethernet chip both use SPI, so we need to disable one before using the other. This is why we initialize digital 10 as an output and set it high. Pin 10 is the chip select pin for the Ethernet chip. When we set it high, we are disabling the chip. This way, we can initialize the SD card without interference from the Ethernet chip.
We can then start the web server with server.begin and obtain its local IP address in a string with Ethernet.localIP.
We then initialize Ethernet with Ethernet.begin. We can also use the Ethernet library to check if the shield or cable is connected:
Use
Ethernet.hardwareStatusto check if the shield is attached. If the return value is equal toEthernetNoHardware, the shield is not attached.Use
Ethernet.linkStatusto check if the cable is connected. If the return value is equal toLinkOFF, the cable is not conected.
In the loop function, we check if there is a new client (a computer has connected to the IP address). The new client will send a HTTP request, like the one below. All lines end with \r\n.
GET / HTTP/1.1
Host: 192.168.0.20
User-Agent: Mozilla/5.0 (X11; Ubuntu; Linux i686; rv:17.0) Gecko/20100101 Firefox/17.0
Accept: text/html,application/xhtml+xml,application/xml;q=0.9,*/*;q=0.8
Accept-Language: en-ZA,en-GB;q=0.8,en-US;q=0.5,en;q=0.3
Accept-Encoding: gzip, deflate
Connection: keep-alive
We read each character from the request with client.read and print them to the Serial Monitor with Serial.write. This is because we are writing the chars as ASCII values and not the chars themselves. For example, Serial.print(65) and Serial.write(65) would display 65 and A, respectively. Using Serial.write excludes the need for type conversion from int to char.
If we have reached the end of the request (newline found and current line is blank) we can send the response, which looks like this:
HTTP/1.1 200 OK
Content-Type: text/html
Connection: close
After sending the response, we can send the HTML contents of the page by reading index.htm from the SD card and sending its contents to the client. After this, we can break from the while loop.
At the end of the while loop, we check if the current line in the request is blank (end of the request). If this occurs, the program will send the response on the next iteration of the loop.
At the end of the loop function, we give the browser time to receive the data, then close the connection.
Running the Code
Plug the Arduino’s USB port into your computer and the Ethernet cable into your router or direct Internet connection. This network should be the same as the one your computer is connected to.
Upload and run the code. When you open the serial monitor, it should tell you the IP address of the server (in this case, 192.168.0.20). The output is below.
Ethernet Web Server
Initializing SD card... Done.
Looking for index.htm... Done.
Server is at: 192.168.0.20
In your web browser, go to the IP address displayed. You should see a page like this:
Using CSS
CSS stands for Cascading Style Sheets. It is a language commonly used with HTML to edit how a page looks. The file extension for CSS is .css.
Save this file as style.css in your SD card:
h1 {
  color: green;
  text-align: center;
  border-bottom: 2px solid green;
}

p {
  color: #148F77;
}

.red {
  color: red;
}
Update index.htm with:
<!DOCTYPE html>
<html>
<head>
<link type="text/css" rel="stylesheet" href="style.css">
<title>Arduino Web Server</title>
</head>
<body>
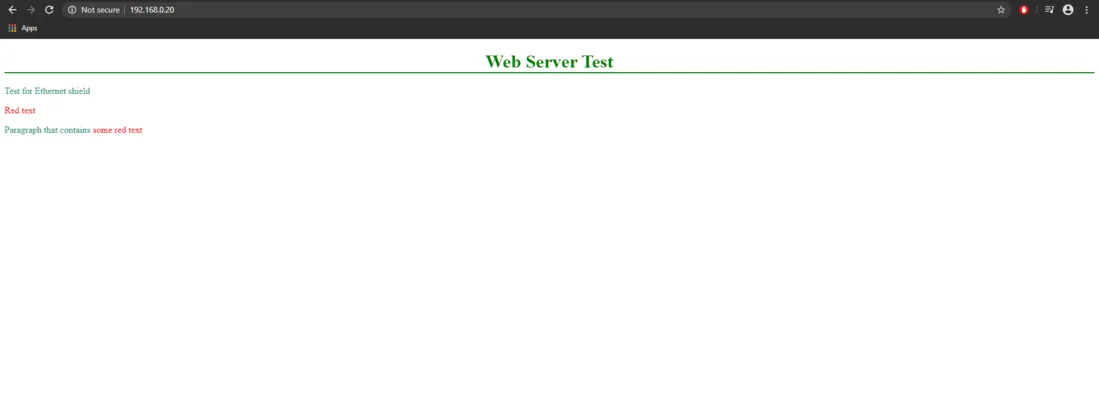
<h1>Web Server Test</h1>
<p>Test for Ethernet shield</p>
<p class="red">Red text</p>
<p>Paragraph that contains <span class="red">some red text</span></p>
</body>
</html>This HTML file uses a new tag: <link> (highlighted above), used to include external files (CSS files here).
Arduino code:
#include <SPI.h>
#include <Ethernet.h>
#include <SD.h>

// MAC address (dependent on your network)
byte mac[] = {0xDE, 0xAD, 0xBE, 0xEF, 0xFE, 0xED};
IPAddress ip(192, 168, 0, 20); // IP address is 192.168.0.20

EthernetServer server(80); // Port 80 is default for HTTP

const int requestLen = 15; // Size of HTTP request array
char request[requestLen];  // HTTP request stored in char array to save memory
int reqIdx           = 0;  // Current index of request

void setup() {
  Serial.begin(9600); // Open a serial port
  Serial.println("Ethernet Web Server");

  // -------------- SD Card init start --------------

  // Disable Ethernet chip while SD card is being initialized
  pinMode(10, OUTPUT);
  digitalWrite(10, HIGH);

  Serial.print("Initializing SD card... ");
  if (!SD.begin(4)) {
    Serial.println("Failed.");
    return;
  }
  Serial.println("Done.");

  // Check if index.htm exists
  Serial.print("Looking for index.htm... ");
  if (!SD.exists("index.htm")) {
    Serial.println("Failed.");
  }
  Serial.println("Done.");

  // -------------- SD Card init end --------------

  // -------------- Ethernet init start --------------

  Ethernet.begin(mac, ip); // Start Ethernet connection with IP and MAC

  if (Ethernet.hardwareStatus() == EthernetNoHardware) {
    // The Ethernet shield is not attached
    Serial.println("Ethernet shield was not found");
    return; // Do nothing
  }
  if (Ethernet.linkStatus() == LinkOFF) {
    // Ethernet cable is not connected
    Serial.println("Ethernet cable is not connected.");
  }

  // Start the server
  server.begin();

  // Print the IP address
  Serial.print("Server is at: ");
  Serial.println(Ethernet.localIP());

  // -------------- Ethernet init end --------------
}

void loop() {
  // Listen for incoming clients
  EthernetClient client = server.available();
  if (client) {
    // New client
    // HTTP requests end with a blank line
    bool currentLineIsBlank = true;
    while (client.connected()) {
      if (client.available()) {
        char c = client.read();
        if (reqIdx < requestLen) request[reqIdx] = c; // Append c to the request
        reqIdx++;

        // if you've gotten to the end of the line (received a newline
        // character) and the line is blank, the http request has ended,
        // so you can send a reply
        if (c == '\n' && currentLineIsBlank) {
          // Open HTM file
          File f; // File to read from SD
          if (contains(request, "GET / ") || contains(request, "GET /index.htm")) {
            // Request to index.htm

            // Send HTTP resonse header
            client.println("HTTP/1.1 200 OK");
            client.println("Content-Type: text/html");
            client.println("Connection: close");  // the connection will be closed after completion of the response
            client.println();
            Serial.println("Request to index.htm");
            f = SD.open("index.htm");
          } else if (contains(request, "GET /style.css")) {
            // Request to style.css

            // Send HTTP resonse header
            client.println("HTTP/1.1 200 OK");
            client.println("Content-Type: text/css"); // Content type is CSS
            client.println("Connection: close");  // the connection will be closed after completion of the response
            client.println();
            Serial.println("Request to style.css");
            f = SD.open("style.css");
          }

          // Send HTML to client
          if (f) {
            while (f.available()) {
              client.write(f.read());
            }
            f.close();
          } else {
            // Unable to open file
            client.println("Unable to open file");
          }

          // Clear request and break
          clearRequest();
          break;
        }
        if (c == '\n') {
          // New line
          currentLineIsBlank = true;
        } else if (c != '\r') {
          // Character on current line
          currentLineIsBlank = false;
        }
      }
    }
    // give the web browser time to receive the data
    delay(1);

    // close the connection:
    client.stop();
  }
}

// Clear all elements of the request array
void clearRequest() {
  for (int i = 0; i < requestLen; i++) request[i] = 0;
  reqIdx = 0; // Reset index to 0
}

// Check if string2 is in string1
bool contains(char* string1, char* string2) {
  int found = 0;
  int len = strlen(string1);

  if (strlen(string2) > len) return false;

  for (int i = 0; i < len; i++) {
    if (string1[i] == string2[found]) {
      found++;
      if (strlen(string2) == found) return true;
    }
    else found = 0;
  }

  return false;
}
Explanation
In the Arduino code, we have included a separate if statement to check if the client requested the CSS file.
Note that in the second line of the response header, we send Content-Type: text/css instead of Content-Type: text/html. This is because we are sending the stylesheet (CSS file) and not a web page (HTML file). In the response, we must specify what type of file we are sending.
Running the Code
Follow the same steps as before. However, you should see a different page like this:
Controlling an LED with AJAX
AJAX stands for Asynchronous JavaScript And XML. It is not a programming language, but the use of JavaScript functions to get information from a server (the Arduino). This allows for additional communication between the browser and Arduino.
Connect an LED to the Arduino’s Digital 2 pin with a resistor in series.
Then, update index.htm on the SD card with the following:
<!DOCTYPE html>
<html>

<head>
  <title>Arduino Web Server</title>
  <script>
    function sendLed(state) {
      const nocache = "&nocache=" + Math.random() * 1000000;
      const request = new XMLHttpRequest();
      request.open("GET", "led&state=" + state + nocache, true);
      request.send(null);
    }
  </script>
</head>

<body>
  <h1>LED with AJAX</h1>
  <button onclick="sendLed('on')">LED On</button>
  <button onclick="sendLed('off')">LED Off</button>
</body>

</html>
The AJAX code is in the JavaScript sendLed function. This will send an HTTP request to the Arduino telling if it should turn the LED on or off (determined by the state parameter). The request also contains a nocache parameter, which will prevent the browser from caching responses from the Arduino (which could result in out-of-date data).
In the body tag, we have two buttons. Each has an onclick attribute pointing to sendLed. However, the parameter given to each button is different; therefore, if you press different buttons, they will send different data.
The Arduino code is as follows:
#include <SPI.h>
#include <Ethernet.h>
#include <SD.h>

// MAC address (dependent on your network)
byte mac[] = {0xDE, 0xAD, 0xBE, 0xEF, 0xFE, 0xED};
IPAddress ip(192, 168, 0, 20); // IP address is 192.168.0.20

EthernetServer server(80); // Port 80 is default for HTTP

const int requestLen = 20; // Size of HTTP request array
char request[requestLen];  // HTTP request stored in char array to save memory
int reqIdx           = 0;  // Current index of request

void setup() {
  Serial.begin(9600); // Open a serial port
  Serial.println("Ethernet Web Server");

  // -------------- SD Card init start --------------

  // Disable Ethernet chip while SD card is being initialized
  pinMode(10, OUTPUT);
  digitalWrite(10, HIGH);

  Serial.print("Initializing SD card... ");
  if (!SD.begin(4)) {
    Serial.println("Failed.");
    return;
  }
  Serial.println("Done.");

  // Check if index.htm exists
  Serial.print("Looking for index.htm... ");
  if (!SD.exists("index.htm")) {
    Serial.println("Failed.");
  }
  Serial.println("Done.");

  // -------------- SD Card init end --------------

  // -------------- Ethernet init start --------------

  Ethernet.begin(mac, ip); // Start Ethernet connection with IP and MAC

  if (Ethernet.hardwareStatus() == EthernetNoHardware) {
    // The Ethernet shield is not attached
    Serial.println("Ethernet shield was not found");
    return; // Do nothing
  }
  if (Ethernet.linkStatus() == LinkOFF) {
    // Ethernet cable is not connected
    Serial.println("Ethernet cable is not connected.");
  }

  // Start the server
  server.begin();

  // Print the IP address
  Serial.print("Server is at: ");
  Serial.println(Ethernet.localIP());

  // -------------- Ethernet init end --------------

  // Configure digital 2 as output
  pinMode(2, OUTPUT);
  digitalWrite(2, LOW); // LED off on start
}

void loop() {
  // Listen for incoming clients
  EthernetClient client = server.available();
  if (client) {
    // New client
    // HTTP requests end with a blank line
    bool currentLineIsBlank = true;
    while (client.connected()) {
      if (client.available()) {
        char c = client.read();
        if (reqIdx < requestLen) request[reqIdx] = c; // Append c to the request
        reqIdx++;

        // if you've gotten to the end of the line (received a newline
        // character) and the line is blank, the http request has ended,
        // so you can send a reply
        if (c == '\n' && currentLineIsBlank) {
          // Send HTTP resonse header
          client.println("HTTP/1.1 200 OK");
          client.println("Content-Type: text/html");
          client.println("Connection: close");
          client.println();

          if (contains(request, "GET / ") || contains(request, "GET /index.htm")) {
            // Request to index.htm
            File f = SD.open("index.htm");

            // Send HTML to client
            if (f) {
              while (f.available()) {
                client.write(f.read());
              }
              f.close();
            } else {
              // Unable to open file
              client.println("Unable to open file");
            }
          } else if (contains(request, "GET /led")) {
            // Request from AJAX server to change LED state
            Serial.print("LED state received: ");

            if (contains(request, "state=on")) {
              Serial.println("On");
              digitalWrite(2, HIGH);
            } else if (contains(request, "state=off")) {
              Serial.println("Off");
              digitalWrite(2, LOW);
            }
          }
          // Clear request and break
          clearRequest();
          break;
        }
        if (c == '\n') {
          // New line
          currentLineIsBlank = true;
        } else if (c != '\r') {
          // Character on current line
          currentLineIsBlank = false;
        }
      }
    }
    // give the web browser time to receive the data
    delay(1);

    // close the connection:
    client.stop();
  }
}

// Clear all elements of the request array
void clearRequest() {
  for (int i = 0; i < requestLen; i++) request[i] = 0;
  reqIdx = 0; // Reset index to 0
}

// Check if string2 is in string1
bool contains(char* string1, char* string2) {
  int found = 0;
  int len = strlen(string1);

  if (strlen(string2) > len) return false;

  for (int i = 0; i < len; i++) {
    if (string1[i] == string2[found]) {
      found++;
      if (strlen(string2) == found) return true;
    }
    else found = 0;
  }

  return false;
}
Explanation
This is the first line of the request to change the LED state, sent by the AJAX code:
GET /led&state=off&nocache=49574.192035966732 HTTP/1.1
The only part of this line that we care about is GET /led&state=off.
There are several changes from the initial version of the code. First, we have set up a string (char request[requestLen]) to capture and store the request for processing.
In the loop function, in addition to checking for index.htm, we also check if the request contains the word "led". Again, this is part of the request sent by our AJAX code that will be processed by the Arduino.
Inside the if (contains(request, "state=on")) statement, we further check if the data contains state=on or state=off. The value sent will depend on the button pressed in the web page.
Running the Code
Follow the same steps as before. However, you should see a page that has a heading: "LED with AJAX". Under this heading, there should be two buttons labeled LED On and LED Off.
When you click the button labeled LED On, the LED should turn on. When you click the button labeled LED Off, the LED should turn off.
Reading Inputs with XML + AJAX
AJAX can also be used to fetch data from the Arduino. In this example, the Arduino will periodically send the values of some of its inputs to the browser.
Note | The Arduino code below uses digital pins 2 and 3 as digital inputs with pullups enabled and A5 as an analog input. You can connect anything to these pins, such as buttons or potentiometers. |
Update index.htm with the following:
<!DOCTYPE html>
<html>

<head>
  <title>Arduino Web Server</title>
  <script>
    function getInputs() {
      const nocache = "&nocache=" + Math.random() * 1000000;
      const request = new XMLHttpRequest();
      request.onreadystatechange = function () {
        if ((this.readyState == 4) && (this.status == 200) && (this.responseXML != null)) {
          // Get the states of digital and analog pins
          const digitalStates = this.responseXML.getElementsByTagName('digital');
          const analogStates  = this.responseXML.getElementsByTagName('analog');

          // Get the number of digital and analog pins
          const numDigital = digitalStates.length;
          const numAnalog  = analogStates.length;

          // Update the states with the new data
          for (let i = 0; i < numDigital; i++) {
            document.getElementsByClassName('digital')[i].innerHTML = digitalStates[i].childNodes[0].nodeValue;
          }

          for (let i = 0; i < numAnalog; i++) {
            document.getElementsByClassName('analog')[i].innerHTML = analogStates[i].childNodes[0].nodeValue;
          }
        }
      }
      request.open("GET", "inputs" + nocache, true);
      request.send(null);
    }

    setInterval(getInputs, 250);
  </script>
</head>

<body>
  <h1>Inputs with AJAX</h1>
  <p>Digital 2: <span class="digital">Not loaded</span></p>
  <p>Digital 3: <span class="digital">Not loaded</span></p>
  <p>Analog A5: <span class="analog">Not loaded</span></p>
</body>

</html>
Here, setInterval is used in JavaScript to call getInputs every 250 ms. The browser sends a request to the Arduino similar to before, but it will now wait for a response. The response contains XML data with the values of the digital and analog inputs, which the JavaScript will use to update the contents of the HTML.
Accessing tags in XML is very similar to HTML DOM. However, document should be replaced with this.responseXML. All the getElementsBy methods can be used, and they behave in the same way as HTML DOM.
We declare two arrays: digitalStates holds all the <digital> tags from the XML. analogStates holds all the <analog> tags. (A full example of the received XML response is below.) Note that getElementsByTagName returns an array.
Next, we get the number of digital and analog pins. This can be done by using the length property of the digitalStates and analogStates arrays.
Finally, we update the HTML DOM with the values from the XML.
The Arduino code is as follows:
#include <SPI.h>
#include <Ethernet.h>
#include <SD.h>

// MAC address (dependent on your network)
byte mac[] = {0xDE, 0xAD, 0xBE, 0xEF, 0xFE, 0xED};
IPAddress ip(192, 168, 0, 20); // IP address is 192.168.0.20

EthernetServer server(80); // Port 80 is default for HTTP

const int requestLen = 15; // Size of HTTP request array
char request[requestLen];  // HTTP request stored in char array to save memory
int reqIdx           = 0;  // Current index of request

int inputPins[] = {2, 3}; // Digital input pins used
int numPins     = sizeof(inputPins) / sizeof(int); // The number of pins used

void setup() {
  Serial.begin(9600); // Open a serial port
  Serial.println("Ethernet Web Server");

  // -------------- SD Card init start --------------

  // Disable Ethernet chip while SD card is being initialized
  pinMode(10, OUTPUT);
  digitalWrite(10, HIGH);

  Serial.print("Initializing SD card... ");
  if (!SD.begin(4)) {
    Serial.println("Failed.");
    return;
  }
  Serial.println("Done.");

  // Check if index.htm exists
  Serial.print("Looking for index.htm... ");
  if (!SD.exists("index.htm")) {
    Serial.println("Failed.");
  }
  Serial.println("Done.");

  // -------------- SD Card init end --------------

  // -------------- Ethernet init start --------------

  Ethernet.begin(mac, ip); // Start Ethernet connection with IP and MAC

  if (Ethernet.hardwareStatus() == EthernetNoHardware) {
    // The Ethernet shield is not attached
    Serial.println("Ethernet shield was not found");
    return; // Do nothing
  }
  if (Ethernet.linkStatus() == LinkOFF) {
    // Ethernet cable is not connected
    Serial.println("Ethernet cable is not connected.");
  }

  // Start the server
  server.begin();

  // Print the IP address
  Serial.print("Server is at: ");
  Serial.println(Ethernet.localIP());

  // -------------- Ethernet init end --------------

  // Configure digital pins as input pullup
  for (int i = 0; i < numPins; i++) {
    pinMode(inputPins[i], INPUT_PULLUP);
  }
}

void loop() {
  // Listen for incoming clients
  EthernetClient client = server.available();
  if (client) {
    // New client
    // HTTP requests end with a blank line
    bool currentLineIsBlank = true;
    while (client.connected()) {
      if (client.available()) {
        char c = client.read();
        if (reqIdx < requestLen) request[reqIdx] = c; // Append c to the request
        reqIdx++;

        // if you've gotten to the end of the line (received a newline
        // character) and the line is blank, the http request has ended,
        // so you can send a reply
        if (c == '\n' && currentLineIsBlank) {
          // Send HTTP resonse header

          if (contains(request, "GET /inputs")) {
            // Send inputs in XML file
            client.println("HTTP/1.1 200 OK");
            client.println("Content-Type: text/xml");
            client.println("Connection: close");
            client.println();
            sendXML(client); // Send XML data to client
          } else {
            // Request to index.htm

            // Open HTM file
            File f; // File to read from SD
            f = SD.open("index.htm");

            // Send HTML to client
            if (f) {
              client.println("HTTP/1.1 200 OK");
              client.println("Content-Type: text/html");
              client.println("Connection: close");
              client.println();
              while (f.available()) {
                client.write(f.read());
              }
              f.close();
            } else {
              // Unable to open file
              client.println("Unable to open file");
            }
          }
          // Clear request and break
          clearRequest();
          break;
        }
        if (c == '\n') {
          // New line
          currentLineIsBlank = true;
        } else if (c != '\r') {
          // Character on current line
          currentLineIsBlank = false;
        }
      }
    }
    // give the web browser time to receive the data
    delay(1);

    // close the connection:
    client.stop();
  }
}

// Clear all elements of the request array
void clearRequest() {
  for (int i = 0; i < requestLen; i++) request[i] = 0;
  reqIdx = 0; // Reset index to 0
}

// Check if string2 is in string1
bool contains(char* string1, char* string2) {
  int found = 0;
  int len = strlen(string1);

  if (strlen(string2) > len) return false;

  for (int i = 0; i < len; i++) {
    if (string1[i] == string2[found]) {
      found++;
      if (strlen(string2) == found) return true;
    }
    else found = 0;
  }

  return false;
}

// Send XML to client containing input data
void sendXML(EthernetClient client) {
  // Send XML data
  client.println("<?xml version='1.0' encoding='UTF-8'?>");
  client.println("<inputs>");

  // Read and send digital pin states
  for (int i = 0; i < numPins; i++) {
    client.print("<digital>");
    client.print(digitalRead(inputPins[i]));
    client.println("</digital>");
  }

  // Read and send A5 state
  client.print("<analog>");
  client.print(analogRead(A5));
  client.println("</analog>");

  client.println("</inputs>");
}
Explanation
We have included another if statement to check if we have received the GET request for the XML file. Note that we send a different header in this statement: the content type is now text/xml instead of text/html, reflecting the type of data being sent.
There is also a new function called sendXML. This function will send all input data in a XML file to the client. The XML data will look like this:
<?xml version="1.0" encoding="UTF-8"?> <!--(1)-->
<inputs>
  <digital>0</digital> <!--(2)-->
  <digital>0</digital>
  <analog>0</analog> <!--(3)-->
</inputs>
XML declaration: mandatory for all XML data.
Contains information for one digital pin.
Contains information for one analog pin.
The first <digital> tag holds the value read by the first digital pin (pin 2) and so on. The <analog> tag holds the value read by A5. To send each pin’s data, we use for loops and iterate through the pins array in sendXML.
Note that there is no easy way to get the length of an array in the Arduino language. We will need array length because of our inputPins array: it contains the pin numbers we are using as inputs. The array length is just the number of pins that we have put in this array.
To calculate the array length, we use sizeof. This is an operator that returns the number of bytes occupied by a variable (in this case, our pins array). By dividing the array size by the size of its data type, we can determine the length.
Running the Code
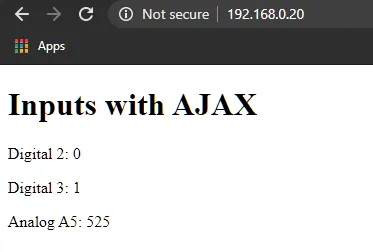
Follow the same steps as in the first example. However, you should see a page that has a heading: "Inputs with AJAX". Under this heading, there should be three rows with the states of all three inputs:
When the state of an input changes, the values should update almost immediately. This is because the function has been configured to run with a delay of 250 ms, or four times per second.