Ethernet I/O Controller with Arduino
Published
Creating a web page with the Arduino and Ethernet shield to control I/O pins
Overview
This project uses a web server page to control the Arduino’s I/O ports remotely. See Ethernet Shield for more details on using the Ethernet shield and its SD card slot with Arduino.
Warning | An Arduino Uno may not have enough memory for this program. You can use any board with sufficient memory, such as a Mega. |
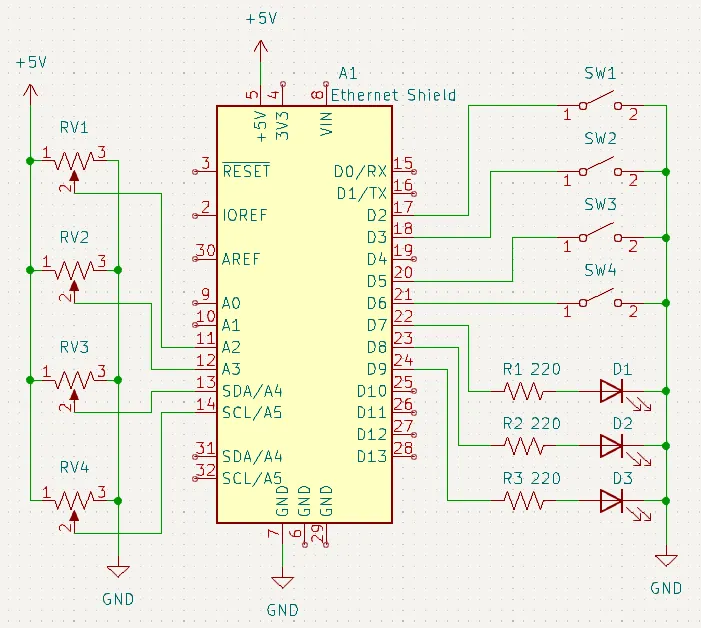
Schematic
HTML File
Save this HTML file as index.htm in your SD card:
<!DOCTYPE html>
<html>

<head>
  <title>Arduino Web Server</title>
  <script>
    var outputStates = [0, 0, 0];

    function setOutput(num, state) {
      outputStates[num] = state;
      var reqString = "outputs";

      for (var i = 0; i < outputStates.length; i++) {
        reqString += "&out" + i.toString() + "=" + outputStates[i];
      }

      var nocache = "&nocache=" + Math.random() * 1000000;
      var request = new XMLHttpRequest();

      reqString += nocache;
      request.open("GET", reqString, true);
      request.send(null);
    }

    function getInputs() {
      var nocache = "&nocache=" + Math.random() * 1000000;
      var request = new XMLHttpRequest();
      request.onreadystatechange = function () {
        if ((this.readyState == 4) && (this.status == 200) && (this.responseXML != null)) {
          // Get the states of digital and analog pins
          var digitalStates = this.responseXML.getElementsByTagName("digital");
          var analogStates  = this.responseXML.getElementsByTagName("analog");

          // Get the number of digital and analog pins
          var numDigital = digitalStates.length;
          var numAnalog  = analogStates.length;

          // Update the states with the new data
          for (var i = 0; i < numDigital; i++) {
            document.getElementsByClassName("digital")[i].innerHTML = digitalStates[i].childNodes[0].nodeValue;
          }

          for (var i = 0; i < numAnalog; i++) {
            document.getElementsByClassName("analog")[i].innerHTML = analogStates[i].childNodes[0].nodeValue;
          }
        }
      }
      request.open("GET", "inputs" + nocache, true);
      request.send(null);
    }

    setInterval(getInputs, 250);
  </script>

  <style>
    .io-container {
      float: left;
      margin-left: 25px;
    }

    .heading {
      text-align: center;
    }
  </style>
</head>

<body>
  <h1>Inputs and Outputs with AJAX</h1>
  <div class="io-container">
    <h2 class="heading">Digital Inputs</h2>
    <p>Digital 2: <span class="digital">Not loaded</span></p>
    <p>Digital 3: <span class="digital">Not loaded</span></p>
    <p>Digital 5: <span class="digital">Not loaded</span></p>
    <p>Digital 6: <span class="digital">Not loaded</span></p>
  </div>
  <div class="io-container">
    <h2 class="heading">Analog Inputs</h2>
    <p>Analog A2: <span class="analog">Not loaded</span></p>
    <p>Analog A3: <span class="analog">Not loaded</span></p>
    <p>Analog A4: <span class="analog">Not loaded</span></p>
    <p>Analog A5: <span class="analog">Not loaded</span></p>
  </div>
  <div class="io-container">
    <h2 class="heading">Digital Outputs</h2>
    <p>Digital 7: <button onclick="setOutput(0, 0)">Off</button> <button onclick="setOutput(0, 1)">On</button></p>
    <p>Digital 8: <button onclick="setOutput(1, 0)">Off</button> <button onclick="setOutput(1, 1)">On</button></p>
    <p>Digital 9: <button onclick="setOutput(2, 0)">Off</button> <button onclick="setOutput(2, 1)">On</button></p>
  </div>
</body>

</html>
This HTML page is similar to the last example in the "Ethernet Shield" article. There are not many changes to the HTML/JS code. This is because we used many loops to iterate through the pins, so the request handling code can be left alone. However, there are more tags that show the input states, since we have more inputs. We have also used <div> tags, which are used to style a group of elements.
We have also used internal CSS in the <style> tag. The float: left; means that the element should go as far left as possible in its container and margin-left: 25px; means that there should be a 25px wide margin to the left of the element.
Arduino Code
#include <SPI.h>
#include <Ethernet.h>
#include <SD.h>

// MAC address (dependent on your network)
byte mac[] = {0xDE, 0xAD, 0xBE, 0xEF, 0xFE, 0xED};
IPAddress ip(192, 168, 0, 20); // IP address is 192.168.0.20

EthernetServer server(80); // Port 80 is default for HTTP

const int requestLen = 35; // Size of HTTP request array
char request[requestLen];  // HTTP request stored in char array to save memory
int reqIdx           = 0;  // Current index of request

int inputPins[] = {2, 3, 5, 6}; // Digital input pins used
int numDigital  = sizeof(inputPins) / sizeof(int); // The number of digital input pins used

int analogPins[] = {A2, A3, A4, A5}; // Analog input pins used
int numAnalog    = sizeof(analogPins) / sizeof(int); // The number of analog input pins used

int outputPins[] = {7, 8, 9}; // Digital output pins used
int numOutputs   = sizeof(outputPins) / sizeof(int); // The number of digital output pins used

void setup() {
  Serial.begin(9600); // Open a serial port
  Serial.println("Ethernet Web Server");

  // -------------- SD Card init start --------------

  // Disable Ethernet chip while SD card is being initialized
  pinMode(10, OUTPUT);
  digitalWrite(10, HIGH);

  Serial.print("Initializing SD card... ");
  if (!SD.begin(4)) {
    Serial.println("Failed.");
    return;
  }
  Serial.println("Done.");

  // Check if index.htm exists
  Serial.print("Looking for index.htm... ");
  if (!SD.exists("index.htm")) {
    Serial.println("Failed.");
  }
  Serial.println("Done.");

  // -------------- SD Card init end --------------

  // -------------- Ethernet init start --------------

  Ethernet.begin(mac, ip); // Start Ethernet connection with IP and MAC

  if (Ethernet.hardwareStatus() == EthernetNoHardware) {
    // The Ethernet shield is not attached
    Serial.println("Ethernet shield was not found");
    return; // Do nothing
  }
  if (Ethernet.linkStatus() == LinkOFF) {
    // Ethernet cable is not connected
    Serial.println("Ethernet cable is not connected.");
  }

  // Start the server
  server.begin();

  // Print the IP address
  Serial.print("Server is at: ");
  Serial.println(Ethernet.localIP());

  // -------------- Ethernet init end --------------

  // Configure digital input pins as input pullup
  for (int i = 0; i < numDigital; i++) {
    pinMode(inputPins[i], INPUT_PULLUP);
  }

  // Configure digital output pins as output
  for (int i = 0; i < numOutputs; i++) {
    pinMode(outputPins[i], OUTPUT);
  }
}

void loop() {
  // Listen for incoming clients
  EthernetClient client = server.available();
  if (client) {
    // New client
    // HTTP requests end with a blank line
    bool currentLineIsBlank = true;
    while (client.connected()) {
      if (client.available()) {
        char c = client.read();
        if (reqIdx < requestLen) request[reqIdx] = c; // Append c to the request
        reqIdx++;

        // if you've gotten to the end of the line (received a newline
        // character) and the line is blank, the http request has ended,
        // so you can send a reply
        if (c == '\n' && currentLineIsBlank) {
          // Send HTTP resonse header

          if (contains(request, "GET /inputs")) {
            // Send inputs in XML file
            client.println("HTTP/1.1 200 OK");
            client.println("Content-Type: text/xml");
            client.println("Connection: close");
            client.println();
            sendXML(client); // Send XML data to client
          } else if (contains(request, "GET /outputs")) {
            if (contains(request, "out0=0")) digitalWrite(outputPins[0], LOW);
            else if (contains(request, "out0=1")) digitalWrite(outputPins[0], HIGH);

            if (contains(request, "out1=0")) digitalWrite(outputPins[1], LOW);
            else if (contains(request, "out1=1")) digitalWrite(outputPins[1], HIGH);

            if (contains(request, "out2=0")) digitalWrite(outputPins[2], LOW);
            else if (contains(request, "out2=1")) digitalWrite(outputPins[2], HIGH);
          } else {
            // Request to index.htm

            // Open HTM file
            File f; // File to read from SD
            f = SD.open("index.htm");

            // Send HTML to client
            if (f) {
              client.println("HTTP/1.1 200 OK");
              client.println("Content-Type: text/html");
              client.println("Connection: close");
              client.println();
              while (f.available()) {
                client.write(f.read());
              }
              f.close();
            } else {
              // Unable to open file
              client.println("Unable to open file");
            }
          }
          // Clear request and break
          clearRequest();
          break;
        }
        if (c == '\n') {
          // New line
          currentLineIsBlank = true;
        } else if (c != '\r') {
          // Character on current line
          currentLineIsBlank = false;
        }
      }
    }
    // give the web browser time to receive the data
    delay(1);

    // close the connection:
    client.stop();
  }
}

// Clear all elements of the request array
void clearRequest() {
  for (int i = 0; i < requestLen; i++) request[i] = 0;
  reqIdx = 0; // Reset index to 0
}

// Check if string2 is in string1
bool contains(char* string1, char* string2) {
  int found = 0;
  int len = strlen(string1);

  if (strlen(string2) > len) return false;

  for (int i = 0; i < len; i++) {
    if (string1[i] == string2[found]) {
      found++;
      if (strlen(string2) == found) return true;
    }
    else found = 0;
  }

  return false;
}

// Send XML to client containing input data
void sendXML(EthernetClient client) {
  // Send XML data
  client.println("<?xml version='1.0' encoding='UTF-8'?>");
  client.println("<inputs>");

  // Read and send digital pin states
  for (int i = 0; i < numDigital; i++) {
    client.print("<digital>");
    client.print(digitalRead(inputPins[i]));
    client.println("</digital>");
  }

  // Read and send analog pin states
  for (int i = 0; i < numAnalog; i++) {
    client.print("<analog>");
    client.print(analogRead(analogPins[i]));
    client.println("</analog>");
  }

  client.println("</inputs>");
}
Running the Code
Follow the same steps as in "Ethernet Shield". However, you should see a different page:
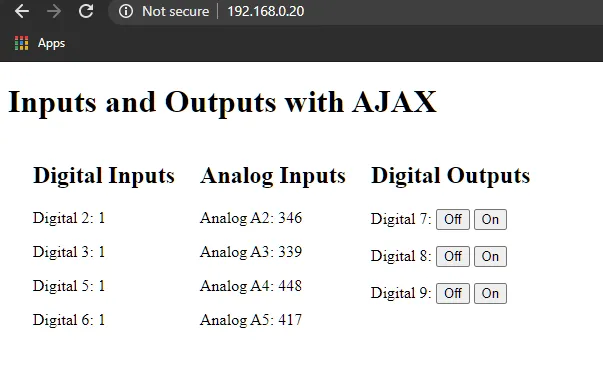
This page contains three columns: one for digital inputs, one for analog inputs, and one for digital outputs.
The first two columns contain the states of digital and analog inputs, respectively.
The last column allows you to control the three digital outputs.