if (Wire.endTransmission() == 0) {
  // Status code 0, there is a device
} else {
  // Status code 4, error
}Arduino I2C Scanner
Published
Scanning and listing all connected I2C devices from the Arduino
Purpose
An I2C scanner iterates through all possible I2C addresses. An I2C scanner can let the user know how many I2C devices are currently connected, as well as the addresses of them.
Software Principles
The Arduino Wire library has a function called endTransmission. It is commonly used after reading/writing data to a device, but it also returns a status code:
0: Success
1: Data too long to fit in transmit buffer
2: Received NACK on address transmit
3: Received NACK on data transmit
4: Other error
Status code 1 is irrelevant in the scanner, as data is not being transmitted in a scanner. Status codes 2 and 3 will also not be used, as we are not receiving any data, only checking if a connection exists.
This only leaves 0 (success) and 4 (error). From this, we can use the following logic to determine if an I2C device is present on a given address:
Code
/*
   I2CScanner.ino
   This program looks for I2C devices connected to the Arduino and prints them in a grid.

   If a device is present, its address will show up in the corresponding row/column.
   Ex. For a device with address 0x48, "48" will show up in row 4 and column 8.

   Created on 16 May 2020 by Aidan Sun
*/

#include <Wire.h>

void setup() {
  // Initialize Wire and Serial
  Wire.begin();
  Serial.begin(9600);

  // Start of grid
  Serial.print("\n    ");

  // Print the grid's top row
  for (int i = 0; i < 16; i++) {
    Serial.print(i, HEX);
    Serial.print("  ");
  }

  Serial.println(); // Newline

  int numOfDevices = 0; // Number of I2C devices detected

  for (byte i = 0; i < 8; i++) {
    // Address tens place 0-7
    Serial.print(String(i) + "0 ");
    for (byte j = 0; j < 16; j++) {
      // Address ones place 0-F
      byte addr = (i * 16) + j; // Concatenate tens and ones to get address

      // Try to start communications with the device and get the status code.
      Wire.beginTransmission(addr);
      byte error = Wire.endTransmission();

      if (error == 0) {
        // If status code is 0, there is a device
        numOfDevices++; // Increment the number of devices
        if (addr < 16) Serial.print("0"); // Add a leading zero if address is < 16
        Serial.print(addr, HEX); // Print the hex address of the device, meaning it's there.
      }
      else {
        // Unknown or no device
        Serial.print("--"); // Print a dash in the device's location
      }
      Serial.print(" "); // Trailing whitespace so addresses are not overlapping
    }
    Serial.println(); // Newline
  }

  // Print number of devices
  if (numOfDevices == 1) {
    Serial.print("\nThere is 1 I2C device.\n");
  }
  else {
    Serial.print("\nThere are " + String(numOfDevices) + " I2C devices.\n");
  }
  Serial.println("Press Reset to scan again.");
}

void loop() {} // No loop
Iterating Addresses
The two nested for loops iterate through each possible address. The outer loop counts to 7 for the hex address' tens place, while the inner loop counts to 15 for the ones place. These bounds are set to fit within the Arduino’s 7-bit I2C addresses.
The tens and ones places are concatenated with (tens*16)+ones, which can be seen in the loops.
Within the loops, the Arduino tries to initialize communication with each possible address and checks the status code as described above.
If the code is 0, we increment the number of devices and print the device’s address.
If the code is not 0 (fail), we leave
numOfDevicesalone and print a dash indicating an empty space.
Testing the Scanner
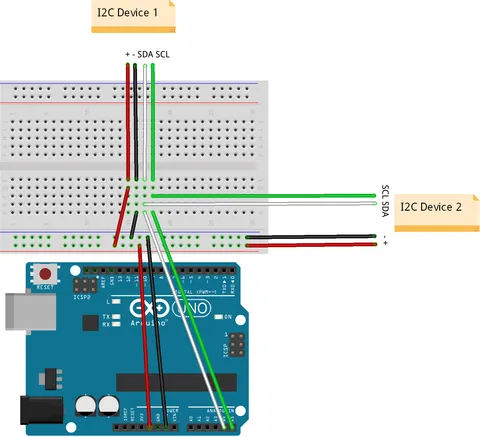
Connect various I2C devices to the Arduino. If you have more than one, you can use a breadboard to break out the Arduino I2C pins.
Note | On many boards, Arduino pin A4 is I2C SDA and A5 is I2C SCL. |
After connecting the I2C devices, run the sketch and open the serial monitor. For example, this is the output from an Arduino connected to a DS1307 (0x68) and I2C LCD (0x3F):
    0  1  2  3  4  5  6  7  8  9  A  B  C  D  E  F
00 -- -- -- -- -- -- -- -- -- -- -- -- -- -- -- --
10 -- -- -- -- -- -- -- -- -- -- -- -- -- -- -- --
20 -- -- -- -- -- -- -- -- -- -- -- -- -- -- -- --
30 -- -- -- -- -- -- -- -- -- -- -- -- -- -- -- 3F
40 -- -- -- -- -- -- -- -- -- -- -- -- -- -- -- --
50 -- -- -- -- -- -- -- -- -- -- -- -- -- -- -- --
60 -- -- -- -- -- -- -- -- 68 -- -- -- -- -- -- --
70 -- -- -- -- -- -- -- -- -- -- -- -- -- -- -- --

There are 2 I2C devices.
Press Reset to scan again.
To run the I2C scanner again, press the Arduino’s onboard Reset button.